How to flash Marlin to your Anet A8 3D Printer
Table of Contents
The hardware might already be a bit old but I recently got an Anet A8 3D Printer. In this post I’ll describe how to flash a current version of the Marlin firmware that offers a lot of additional features and basic protection stuff that Anet was too lazy (?) to add to the stock firmware.
I got the printer from a friend, so the thing was already fully assembled, used and modified a few times with a few broken cables and loose screws. It still was on some version of the stock firmware and called itself “Omni A8” when booting, hinting to the firmware being quite old.
After watching a lot of different videos and reading probably all of the available blog posts I could find, I settled on a mashup of the methods that were presented because this was the most comfortable way of doing this for me.
Requirements
There are a few things we’ll need to do before the flashing can begin.
Programmer
From the hardware point of view, the A8 alone won’t be enough.
You’ll also need the USBasp flasher. Either for flashing a bootloader that allows you to flash a firmware using the USB port on the printer board or for flashing the firmware directly.
I ordered this one mainly because it was relatively cheap and came in a two pack, which might be important later if you get the cheap ones.
VS Code
Yes, I know it’s garbageware by garbagecorp but I had this installed already for ESP32 stuff before I switched to PlatformIO in CLion and there is a VSC plugin that provides one-click builds of Marlin.
You can download that thing here.
Plugins
Once downloaded and started for the first time, click on the “Plugins” tab (the four cubes where the top right cube is offset) and install the PlatformIO IDE plugin.
After PlatformIO has finished installing (you’ll need to reload the webpage that is the editor) you’ll need to install the Auto Build Marlin plugin.
AVRDUDE
Another required software is AVRDUDE. On macOS this can be installed with Homebrew, on Linux you might have it in your distributions package repository.
Preparations
This section will mostly prevent you from running into problems later.
Updating the USBasp
The first issue I had with all the available guides was that the firmware on the USBasp was too old. This issue will make any upload attempts fail with some sort of sync error.
That’s why it’s good that the flasher I bought came in a two pack, because to update the firmware you’ll need a second one.
If you think that this is already a bit ridiculous, keep in mind that the latest firmware for this thing was released in 2011! 🙈
To allow the firmware upgrade, you’ll need to find two contacts on the USBasp you want to update labeled J2 and bridge them. If you’re lucky those contacts might have pins soldered on them, in my case there were just the contacts so I bridged them with a bit of solder.
Additionally, the jumpers on both flashers must be set to 5V for both of them.
If the all the jumpers are set to the required positions, plug in the cable into both flashers (feels obvious but align the notches, don’t force it the other way) and plug the flasher where J2 is not bridged into your computers USB port.
You can find the latest version of the firmware on this page as of the time this post is written the file to download is called usbasp.2011-05-28.tar.gz.
Extract the contents of this file, then create a new folder somewhere and copy the file /bin/firmware/usbasp.atmega8.<VERSION>.hex from the extracted files into the new folder. Replace <VERSION> with the version of the firmware you downloaded.
Now open a terminal, change into the previously created folder and execute the following command to create a backup of the current firmware on your USBasp:
avrdude -c usbasp -p atmega8 -U flash:r:usbasp-backup.bin:r
This will create a file called usbasp-backup.bin in the current folder.
The next step is to upload the new firmware, again replace <VERSION> with the version you downloaded:
avrdude -c usbasp -p atmega8 -U flash:w:usbasp.atmega8.<VERSION>.hex
This will upload the new firmware and then verify that the written data is correct.
If everything went well you can remove the flashers from your computer, remove the cable from the updated unit and then remove the J2 bridge to disable update mode.
Downloading Marlin
Now we can finally start with the actual printer firmware. First of all you’ll need the firmware code itself.
You can find the latest version on the GitHub releases page. In my case the current version was 2.0.9.1 (this will be important later).
At the end of each release is a list of files, we’ll need the archive of the source code. You can extract it you want, but you need to extract it.
You’ll also need the configuration files, which are stored in a separate repo.
You can find an overview of the available branches on this page, if you downloaded the latest version you can probably find the correct branch in the “Active branches” box.
When clicking on the branch name (which should be release-<VERSION>, where <VERSION> is the version of Marlin you downloaded), you can use the “Code” dropdown to download a ZIP of the corresponding branch.
Extract the configurations anywhere you want, then navigate to /config/examples/Anet/A8 and copy all the files into the Marlin folder inside the extracted Marlin source code (there should be file called Version.h in the same directory), replace any conflicting files!
Configuring the firmware
Now that all the necessary files are downloaded, extracted and put in the right place, we can start configuring the firmware.
To do this, open the Marlin root folder (where the README.md is in) with VS Code using the “Open Folder” button.
You might also need to confirm that you trust the project for all the features to work properly.
Then open /Marlin/Configuration.h.
Thermal Runaway Protection
The first feature that you should enable is thermal runaway protection. This will make the firmware make sure that the temperature measured is rising when a heater is active.
So in case of a faulty, not connected or fallen off sensor the heating stops (instead of getting hotter until everything starts burning).
With the Configuration.h opened, press cmd+f or ctrl+f to open the search box and search for THERMAL_PROTECTION.
As of version 2.0.9.1, there are four lines starting with #define, enabling the protection for HOTENDS, BED, CHAMBER and COOLER. All of these should be enabled (VS Code will color the defines pink and the names blue instead of coloring everything green and the line starts with #define, not with //#define.
Mesh Bed Leveling
Another useful feature is mesh bed leveling which allows you to manually configure zero points (or more precisely their offsets) for nine points on the bed. The printer will then use the resulting offsets to nicely print on a not perfectly leveled bed.
To enable this, search for MESH_BED_LEVELING and make sure the feature is defined.
Leveling Menu Items
To have a menu available in the firmware that will let you level manually, you need to enable the define LEVEL_BED_CORNERS. A few lines below that you can also enable LEVEL_CENTER_TOO if you want a more precise leveling.
Stepper Inverts
Since the printer I got came with a customized extruder, the direction happened to be reversed. The first time I tried to extrude, the filament came out at the top.
This can be fixed by searching for INVERT_E0_DIR and setting this to true to make the firmware change directions.
This might not be needed if you have the stock A8 extruder!
And in case you have other modified motors you can find the corresponding defines for all the motors in the same area of the file.
Building the firmware
Now that all the needed configuration is done the firmware needs to be built. This can be done by opening the “Auto Build Marlin” Tab (the one with the m).
In the opened side menu, click the hammer symbol at the top:
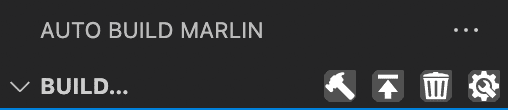
This will open the build tab where you can click the build button for the sanguino1284p environment to start the firmware build:

When the build is finished successfully, the terminal will show output like the following:
Building in release mode
Checking size .pio/build/sanguino1284p/firmware.elf
Advanced Memory Usage is available via "PlatformIO Home > Project Inspect"
RAM:   [===       ]  26.3% (used 4307 bytes from 16384 bytes)
Flash: [========= ]  93.2% (used 118336 bytes from 126976 bytes)
================================================= [SUCCESS] Took 2.95 seconds =================================================

Environment    Status    Duration
-------------  --------  ------------
sanguino1284p  SUCCESS   00:00:02.950
================================================= 1 succeeded in 00:00:02.950 =================================================
You can see the amount of flash that is left over is pretty small. If we start enabling more features we might run out of space.
That is why I decided to not flash any bootloader and simply flash the firmware directly everytime I need to flash a new one.
A successful build will also show a success message:

You can click the folder icon to open the output folder. A file called firmware.hex should be selected as well.
Copy this file somewhere where you’ll find it again and maybe give it a more descriptive name (I like to add the features I enabled and the date to the name).
Flashing the firmware
Now it’s time to flash the compiled firmware to the printer.
To do this, first find the USBasp that has the current firmware on it and make sure that J2 is not bridged and that the power is set to 5V.
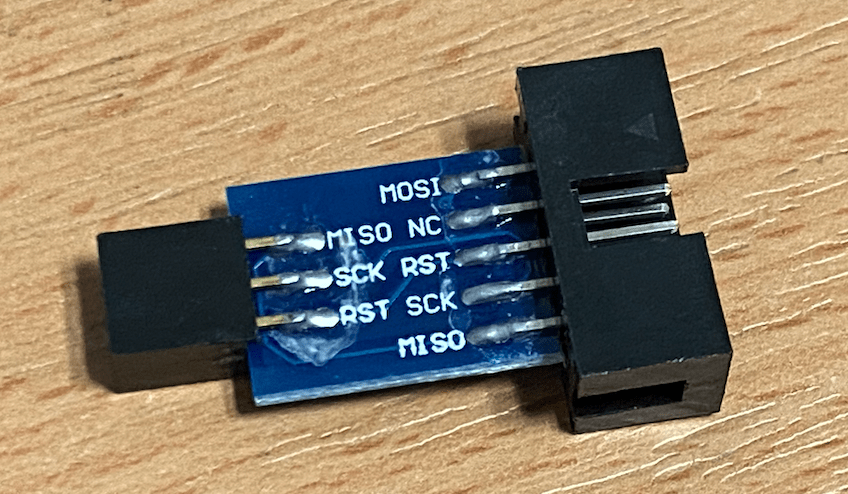
Connect the cable to the USBasp and the included 6 pin female adapter (see picture below) to the other side of the cable.
IMPORTANT: Before continuing disconnect the power supply from the printer. Make sure the printer is powered off and not plugged in.
The 6 pin adapter needs to be connected to the middle pins of the JTAG connector on the printer board. The side with the RST pin must face the notch in the socket on the printer board. See the diagram below for reference:

This picture is licensed CC-BY-SA by 3dprint.wiki.
If everything is connected, plug the USBasp into your computer. DO NOT turn the printer on! Leave it disconnected! The printer board will receive power from the USBasp (or more precisely your computer).
Now navigate to the folder with the compiled firmware and start by pulling a backup from the printer:
avrdude -c usbasp -p atmega1284p -U flash:r:flashbackup-anet-a8.bin:r
This will create a file called flashbackup-anet-a8.bin containing the original firmware on the printer.
Now we can flash the Marlin version that was compiled earlier, replace firmware.hex with the name you chose for the compiled firmware:
avrdude -c usbasp -p atmega1284p -U flash:w:firmware.hex
This will flash the firmware to the printer and then read it to verify that the data written to the printer is correct.
If the flashing is complete, unplug the USBasp from your computer and then remove it from the printer board, afterwards you can plug in the printer again and test if everything works.
Final thoughts
After the first boot, you’ll probably see an EEPROM error, this is because the memory gets cleared by avrdude everytime a new firmware is written. You can select reset and press the middle button to initialize the memory.
I know that connecting the USBasp every time you make a change in the firmware configuration is not as comfortable as just plugging in the USB cable but I’d rather have as much space as possible available to the firmware in case I add more stuff to the printer later on.
I hope this guide was useful to you, if you have any problems or additions feel free to contact me.